IPv6 and Junos - Firewall Filter (ACLs)
For IPv6 testing I’ve been asked to do one of the more noddy things to test Firewall Filters; these are Stateless Firewall Filters and are what Cisco call Access Control Lists (ACL). Unlike Stateful Firewall Filters, Stateless Filters do not inspect traffic flows, pattern or keep a record of network connections, as such TCP streams and/or UDP communication. Instead, these filters evaluate packet contents statically against a set of packet-matching rules that either permit or deny packets transiting the switch.
Firewall Filter (ACL) is an important feature for a switch to have as it provides some (although limited) protection for devices and host directly connected. I said that this was one of the more noddy things as there’s only one difference between creating a Firewall Filter for IPv4 and IPv6. However, as they say, better to be safe than sorry! With all that said and done, this post will be to show how you’d configure and implement a Stateless Firewall Filter within Junos.
Let’s get cracking :)
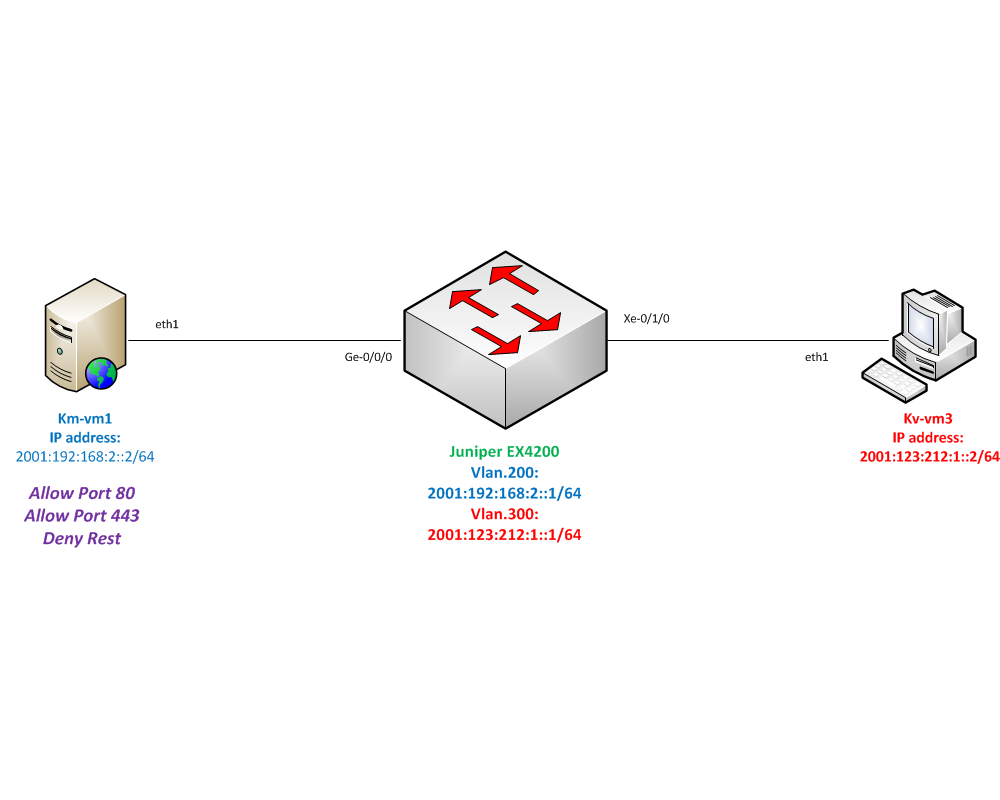
I had a pretty simple topology, using a Juniper EX Series 4200 switch configured with two Layer-3 vlans, and I’ve set up two Ubuntu 14.04LTS ESXi host; 1 of the host will be configured as a webserver (km-vm1) and the other as a client trying to access the server (km-vm3)
Base Configuration⌗
Firstly, I created all of the physical and logical connections were expected, by running show ipv6 neighbors and show lldp neighbors
IPv6 Subnets⌗
root@EX4200-A> show ipv6 neighbors
IPv6 Address                 Linklayer Address  State       Exp Rtr Secure Interface
2001:123:212:1::2            00:0c:29:fc:d5:de  stale       202 no  no      vlan.300
2001:192:168:2::2            00:0c:29:4f:26:c5  stale       1197 no no      vlan.200
Servers⌗
root@EX4200-A> show lldp neighbors
Local Interface    Parent Interface    Chassis Id          Port info          System Name
ge-0/0/0.0         - 00:0c:29:4f:26:bb   eth1               km-vm1
xe-0/1/0.0         - 00:0c:29:fc:d5:d4   eth1               km-vm3
The goal of this test is ensure that KM-VM3 can ONLY access KM-VM1 on TCP ports 80 and 443, as these are well-known and IANA defined ports for unsecured (HTTP) and secured (HTTPS) web traffic, and ICMP traffic (ie. ping and traceroute).
Before configuring the Firewall Filter I wanted to see what was accessible for KM-VM3, so I ran a very useful open source utility for network discovery and a security auditing tool called nmap , to produce a port scan of the webserver. From the output we can see that not only are HTTP and HTTPS accessible, but the Port 22 Secure Shell (SSH) is open. As KM-VM1 doesn’t have any firewalling configured on the server level via iptables, KM-VM3 could be used to try and hack KM-VM1 by attacking the SSH port to gain access to the server, which is never good!
Port Scan⌗
marquk01@km-vm3:~$ nmap -6 2001:192:168:2::2

Starting Nmap 6.40 ( http://nmap.org ) at 2015-11-11 14:17 GMT
Nmap scan report for 2001:192:168:2::2
Host is up (0.0017s latency).
Not shown: 997 closed ports
PORT    STATE SERVICE
22/tcp  open  ssh
80/tcp  open  http
443/tcp open  https
SSH access⌗
marquk01@km-vm3:~$ ssh 2001:192:168:2::2
The authenticity of host '2001:192:168:2::2 (2001:192:168:2::2)' can't be established.
ECDSA key fingerprint is e3:e3:f7:91:c0:30:a3:02:f9:1f:fd:aa:b7:0d:9c:9d.
Are you sure you want to continue connecting (yes/no)? yes
Warning: Permanently added '2001:192:168:2::2' (ECDSA) to the list of known hosts.
marquk01@2001:192:168:2::2's password:
With that security risk in mind, lets add a Firewall Filter that will only allow access to ports 80, 443 and ICMP traffic. I created a prefix-list, webservers, that would list all the prefixes (IP addresses) for the webservers. Although in this example, I’ll only have the one prefix, I was always taught to use prefix-lists for ease of configuration. This was configured under edit policy-options prefix-list stanza:
marquk01@EX4200-A# show policy-options
prefix-list webservers {
    2001:192:168:2::2/128;
}
Now, for the Filter you’ll need to be under firewall family inet6 filter stanza, (for an IPv4 filter; firewall family inet filter). You can name your filter anything however, it can’t be more than 64 characters and if you have any spaces you’ll need to use " " marks. The same goes with naming your rules, which Junos calls terms. The Filter must have at least one term and the term(s) must have from or then statement. The from and then statements provide the actions of the term.
As you can see below, the Firewall Filter is named ALLOW-HTTP/HTTPS and has 3 terms:
{master:0}[edit firewall family inet6 filter ALLOW-HTTP/HTTPS]
root@EX4200-A# show
term allow-http/https {
    from {
        source-address {
            ::/0;
        }
        destination-prefix-list {
            webservers;
        }
        destination-port [ 80 443 ];
    }
    then accept;
}
term allow-icmp {
    from {
        icmp-type [ echo-reply echo-request neighbor-advertisement packet-too-big destination-unreachable neighbor-solicit ];
    }
    then accept;
}
term deny-all {
    then {
        count deny-all;
        log;
        discard;
    }
}
Lets break down each aspect of this Firewall Filter:
- The first term
allow-http/httpsstates from source-address ::/0, for IPv6 is any address to the destination of the webservers, which has been defined in the prefix-list to ports 80 and 443 (HTTP and HTTPS) to then accept those packets - The second term
allow-icmpstates the different type of icmp packets that I want allowed and then those are accepted - The final term
deny-allstates that any other packets should be counted under deny-all, logged and discarded. By using the action discard, this will silently drop all packets without sending an ICMP reply back to the requestor
Firewall Filter⌗
With Junos, it is important to remember that when creating a Firewall Filter:
- They works as
Top-Down Listso the order of your rules is very significant, because once a rule has been matched, any rules below WILL NOT be checked. - Additionally just like with Cisco Firewall Filters come with an Implicit Deny at the end. If any packets don’t match any of the previous terms then they will be dropped automatically. Although this Implicit Deny is there, best practice to add a
deny-allterm at the end any Firewall Filter or ACL. - Finally, you can have only one input and one output filter per interface however have as many terms as you like. You can find all the guidelines that come with Firewall Filters here on Juniper’s TechLibrary page
Having created the filter, it will an input filter, as it is configured to filter traffic coming into the switch. Additionally, it will be place on the outside-facing interface, in this example, that has KM-VM3 in (vlan.300). This is because with any Filter, ACL or Firewall Policy, you want to stop any unnecessary traffic traversing your network at the furthest possible point, which is normally the edge of your network.
So under interface vlan unit 300 family inet6 filter stanza the Firewall Filter is placed as an input filter:
{master:0}[edit interfaces vlan unit 300]
root@EX4200-A# show
family inet6 {
    filter {
        input ALLOW-HTTP/HTTPS;
    }
    address 2001:123:212:1::1/64;
}
Having committed the configuration, if we go back onto KM-VM3 and do some testing we’ll be able to see the effect of the Firewall Filter. As we can see below, when the port scan was run again, only ports 80 and 433 are in an OPEN STATE and SSH port 22 isn’t shown at all now, and we’re able to ping. When we try SSH we get nothing, which shows that this filter is working as expected.
Port Scan⌗
marquk01@km-vm3:~$ nmap -6 2001:192:168:2::2

Starting Nmap 6.40 ( http://nmap.org ) at 2015-11-11 15:30 GMT
Nmap scan report for 2001:192:168:2::2
Host is up (0.00072s latency).
Not shown: 998 filtered ports
PORT    STATE SERVICE
80/tcp  open  http
443/tcp open  https
ICMP Ping⌗
marquk01@km-vm3:~$ ping6 2001:192:168:2::2
PING 2001:192:168:2::2(2001:192:168:2::2) 56 data bytes
9 packets transmitted, 9 received, 0% packet loss, time 7999ms
rtt min/avg/max/mdev = 0.464/0.545/0.662/0.066 ms
SSH access⌗
marquk01@km-vm3:~$ ssh 2001:192:168:2::2
^C
For further verification, we can check the counter that was set under the deny-all term to see how many packets have been dropped. By running the command show firewall counter filter ALLOW-HTTP/HTTPS deny-all we’re able to see the counters at that time.
root@EX4200-A> show firewall counter filter ALLOW-HTTP/HTTPS deny-all

Filter: ALLOW-HTTP/HTTPS
Counters:
Name                                                Bytes              Packets
deny-all                                              490                    5
As I said, when I started this post, the method of applying a Firewall Filter is exactly same in IPv6 world as it is in IPv4, with the exception of the filter location. Firewall Filters are extremely important in giving protection to hosts and devices connected to the switch if a stateful firewall such as a Juniper SRX or Cisco ASA isn’t suitable and/or available in your network design.